Security Settings
General information
The Workflow Server security system is based on OpenID Connect and implemented using the OpenIddict library.
The settings related to security are edited in the following locations:
- in Settings section - in the Security tab.
- in the Users section.
Authentication Settings
Starting from Workflow Server 9.0.0, authentication is handled exclusively by OpenIddict.
OpenIddict, running inside the Workflow Server is used to authenticate Users. Authentication can be performed both by login and password and through external sources that support OpenId.
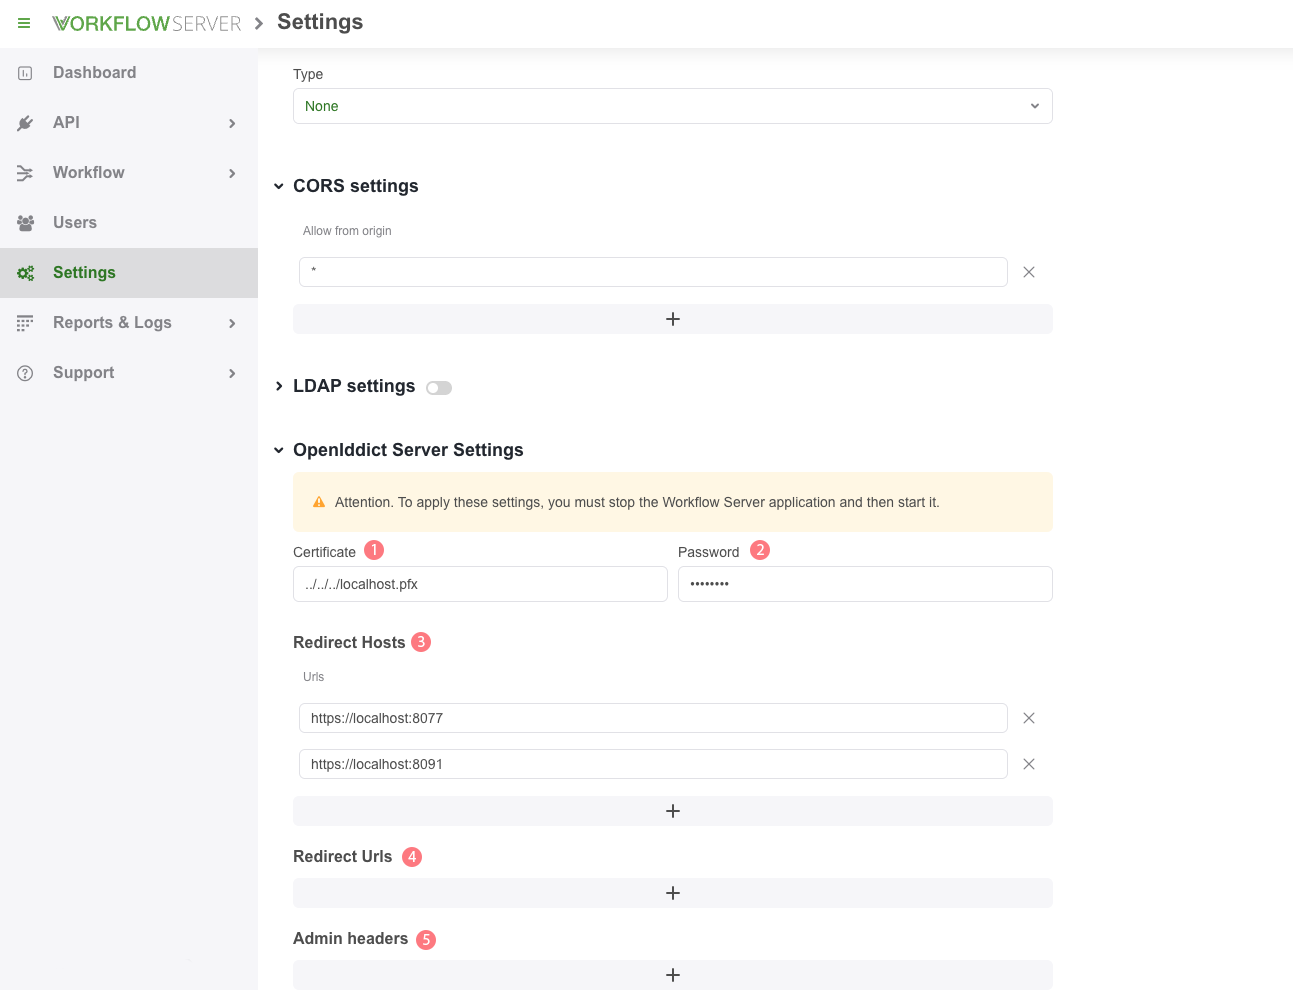
It is very important to fill in Redirect Hosts URLs for redirects to ensure correct authentication settings. The options can be accessed by: 'Settings' -> in the 'Security' tab.
-
Certificate file - the path to the certificate for signing authorization tokens. If there is no certificate, it will be generated automatically, but that is not recommended.
-
Certificate password - the certificate password for signing authorization tokens.
infoIf you are going to use OpenID Connect, you must connect a trusted certificate and ensure all communication occurs over HTTPS protocol.
-
Redirect hosts - a list of the hosts allowed for redirects.
-
Redirect urls - a list of the URLs allowed for redirects. By default, the admin url are used.
-
Admin headers - a list with headers that will be added to each request.
If any of these settings are changed, the server instance must be physically restarted. That is, the Workflow Server application should be stopped and then restarted.
Enabling OpenIddict Server
The OpenIddict Server is disabled by default, so you can enable it if necessary. To do this, add the following to the config file:
{
  "DisableOpenIddictServer": false
}
Restricting Access to Admin Panel and API
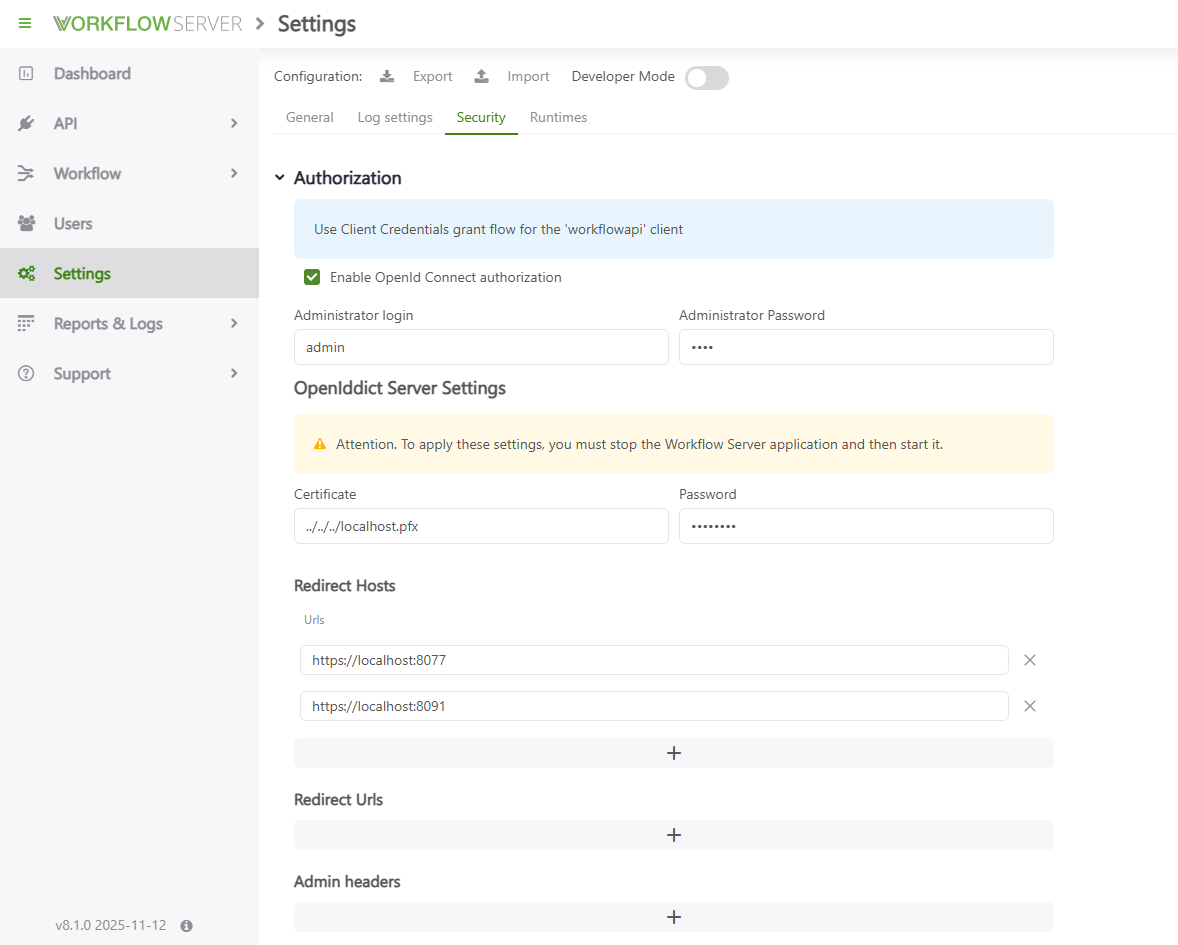
Once OpenId Connect is configured, you can protect the admin panel and API. In Settings -> Security:
- Enable OpenId Connect authorization.
- Specify an Administrator login and password.
After saving:
- access to the admin panel requires edministrator credentials;
- access to the API requires an access token.
A detailed explanation of how to obtain and use access tokens for the API is provided in this article.
Working with Users
The User interface is quite simple.
- The list of Users, double click opens the User card.
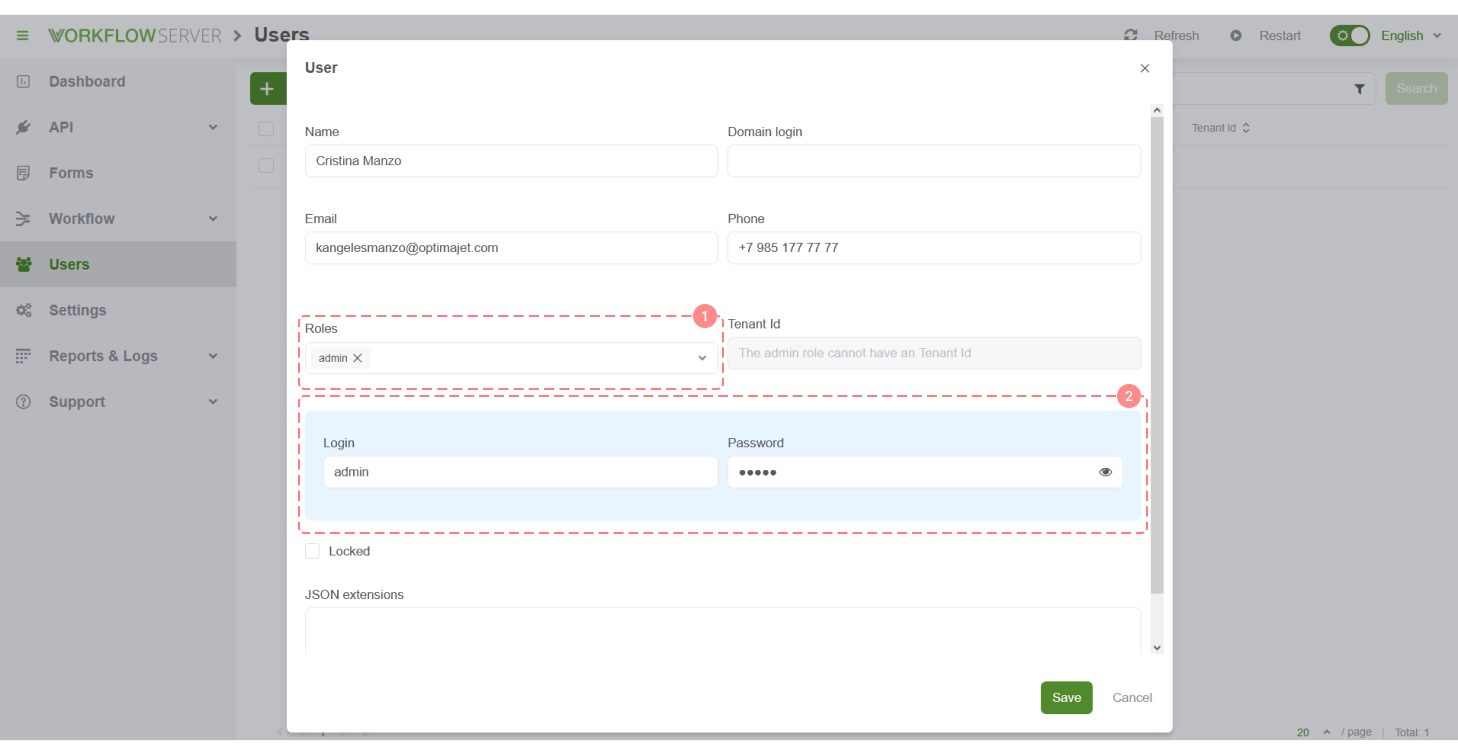
The user editing interface is also very simple.
- Roles can be assigned to a User, and then, checked in your workflow.
- If you want the user to log in by login and password, which are stored (password as a hash) in the database, then you can specify them in the user card.
There are four main ways to create Users in the Workflow Server:
- Creating and editing Users through the admin panel interface.
- Creating and editing Users through the Workflow API.
- Importing Users via LDAP.
- Automatic User creation when logging in through external sources that support OpenId (Facebook, Google, Okta).
User might import settings via LDAP which are in the Setting page - in the Security tab.
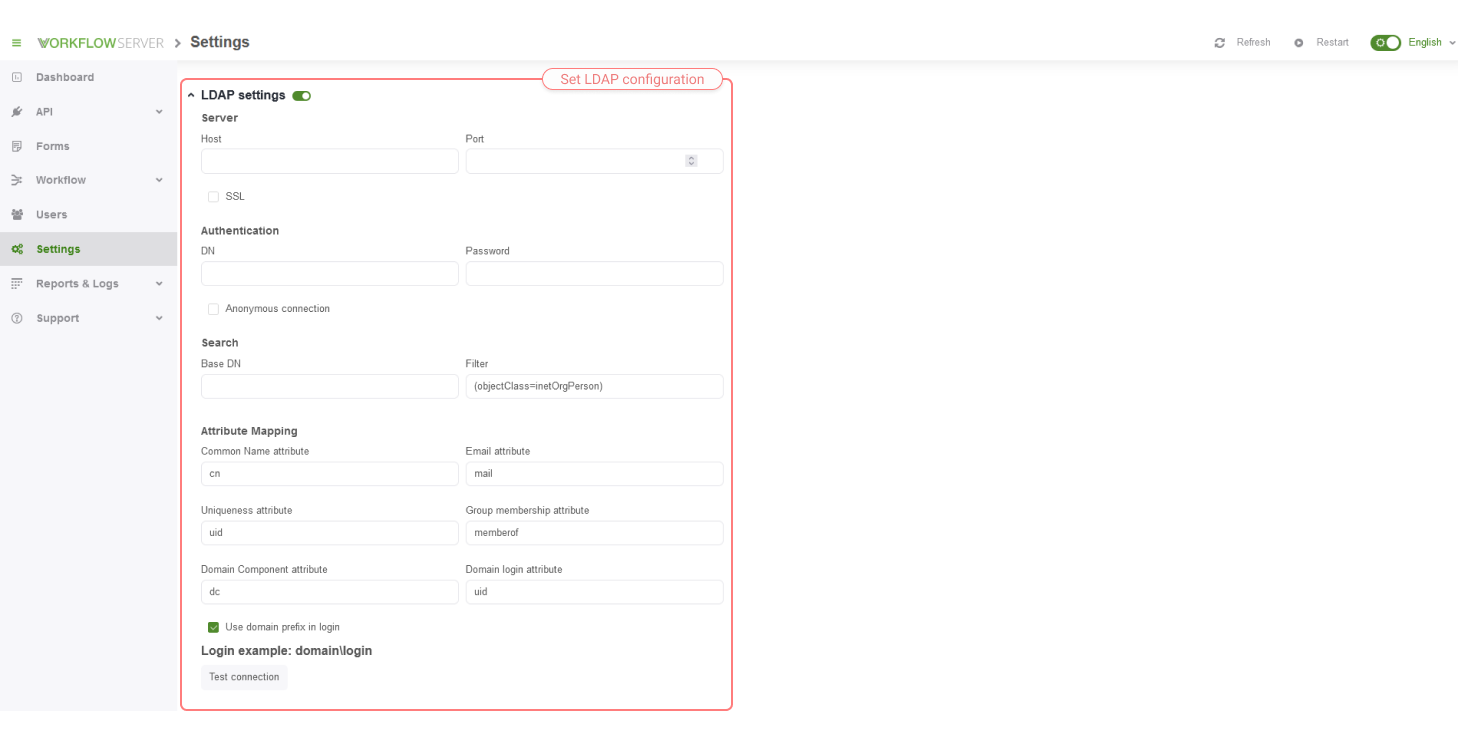
If the connection to LDAP is configured, the Import from AD button will appear in the User interface; then clicking on it, you can import Users. In this case, User groups are registered as the roles of these Users.
Set the properties in the config.json file to encrypt the LDAP password in the database.
{
  //...
  "LdapEncryptPassword": true,
  "Salt": "someSecureSaltForEncryption",
  //...
}
Then restart the Workflow Server and save the LDAP settings through the admin panel. This will update the LDAP settings in your database.
CORS (Cross-Origin Resource Sharing)
It is used to provide a web page with access to resources from another domain.
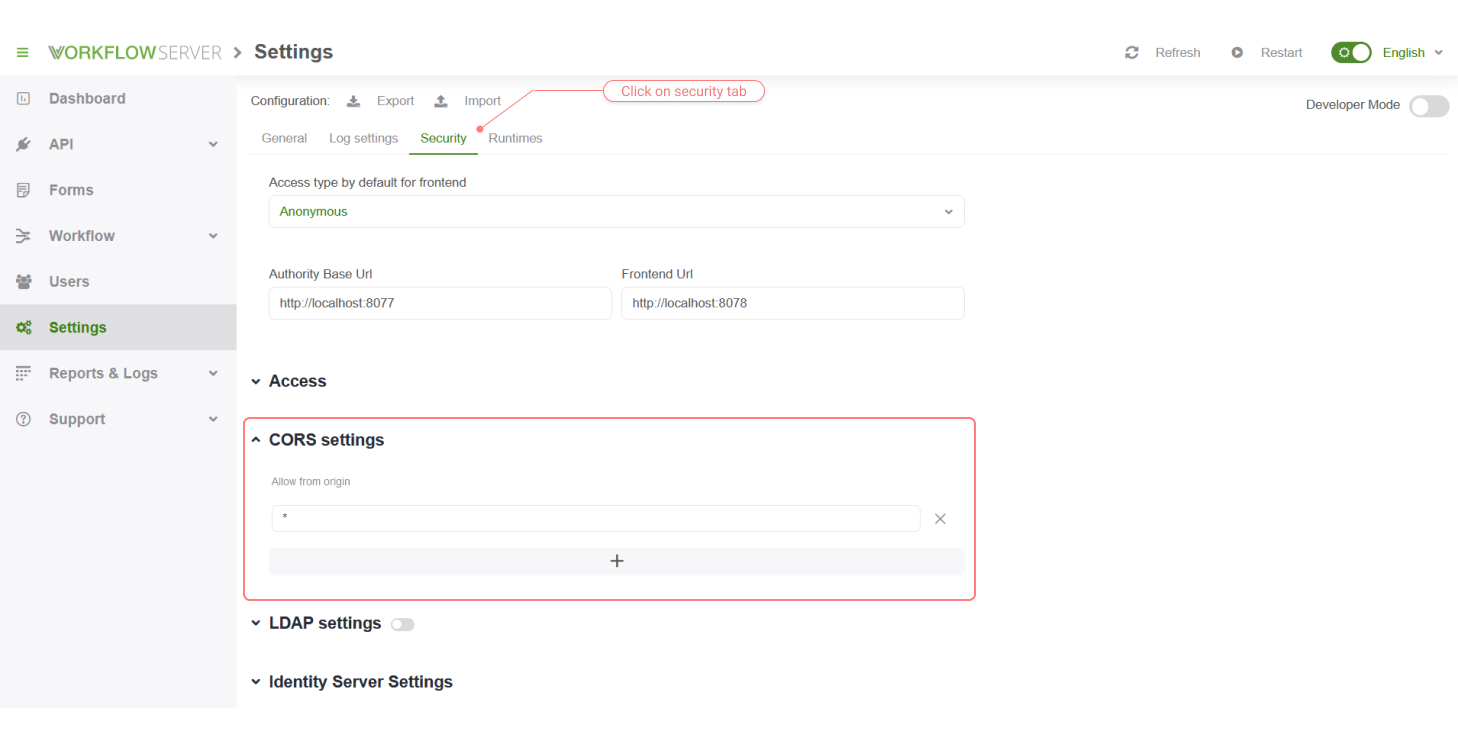
Adjusted parameters:
- Allow from origin - addresses to send requests, with allowed access to the Workflow Server, for example, to the Workflow API.
Custom OpenId Connect Providers
Custom OpenId Connect providers are connected using the WorkflowServerRuntime.RegisterOpenIdConnectProviders method. That is, you can only
add them by customizing the Workflow Server code.
public void RegisterOpenIdConnectProviders(params Action<OpenIddictClientBuilder>[] registerActions)
Through WorkflowServerInitializer:
(bool success, IWebHost host) = initializer.BuildWebHost(workflowServer =>
{
    ...
    //Register your own Identity Providers:
    workflowServer.RegisterOpenIdConnectProviders(authBuilder =>
    {
        authBuilder.AddRegistration(new OpenIddictClientRegistration
        {
            Issuer = new Uri("https://localhost:44323"),
            ClientId = "wfs-client",
            ClientSecret = "DF77F57E-3BD4-4E06-B464-FC4B497D0B20",
            ProviderDisplayName = "OpenIddict server",
            ProviderName = "OpenIddict",
            RedirectUri = new Uri("https://localhost:8077/account/callback"),
            ResponseTypes = { "code" },
            Scopes =
            {
                OpenIddictConstants.Scopes.OpenId,
                OpenIddictConstants.Scopes.Profile,
                OpenIddictConstants.Scopes.Email
            }
        });
    });
});
You can use your own implementations of IExternalLogonService and IExternalCredentialsProcessor after registering them via the
WorkflowServerRuntime methods:
public WorkflowServerRuntime SetExternalLogonService(IExternalLogonService externalLogonService)
public WorkflowServerRuntime SetExternalCredentialsProcessor(IExternalCredentialsProcessor externalCredentialsProcessor)