How to manage user roles in Workflow Server?
Workflow Server uses Rules (authorization rules) to manage access to the Commands. You can define this list of Rules in an external system and configure Workflow Server to call them.
You should create the following three HTTP API methods:
- Getting rules – returns the list of available Rules.
- Checking the rule – checks the Rule for a certain user.
- Getting identities – returns all users that match the Rule.
Let us create the rules to check a user role. We used codesandbox.io to create a simple server that implements CallbackAPI for WorkflowServer. An example can be found here.
For the sake of simplicity, we declared an array of users; each user has a name, identifier, and a list of the appropriate roles.
var users = [
  { name: "User1", userId: "User1", roles: ["User", "Manager", "Accountant"] },
  { name: "User2", userId: "User2", roles: ["User", "Manager"] },
  { name: "User3", userId: "User3", roles: ["User", "Supervisor"] },
  { name: "User4", userId: "User4", roles: ["User"] }
];
Then, we developed the following three functions:
-
getrules– returns the list of the rules available in the system. In this example, we consider one rule, CheckRoleCallback that checks if the user has a certain role. Thus, the code given below returns a sting array that consists of one string — 'CheckRoleCallback':function getrules({ schemeCode }) {
return ["CheckRoleCallback"];
}cautionDon't name the callback rules 'CheckUser' or 'CheckRole' because it is predefined rules for work with the Workflow Server users and roles.
-
checkrule– this function checks if the current user with theidentityIdidentifier has a role with the name that is specified inparameter. Theparametervalue is set in the Actors form in the WorkflowDesigner. It is entered in the Value column of this form and passed to the function below:function checkrule({ name, identityId, parameter, processInstance }) {
if (name === "CheckRoleCallback") {
let roleName = parameter;
let user = undefined;
users.forEach(function(u) {
if (u.userId === identityId) user = u;
});
if (user && Array.isArray(user.roles)) {
return user.roles.includes(roleName);
}
}
return false;
} -
getidentities– returns a list of identifiers of all users with the role specified. The role name is passed throughparameterin the same way as in the previous function.function getidentities({ name, parameter, processInstance }) {
if (name === "CheckRoleCallback") {
let roleName = parameter;
let identities = [];
users.forEach(function(u) {
if (Array.isArray(u.roles) && u.roles.includes(roleName)) {
identities.push(u.userId);
}
});
return identities;
}
return [];
}
In the Callback API section of the admin panel, fill in the URL addresses for the functions implemented above. An example of filling is given on this page; pay special attention to the URL values.
Then, the CheckRoleCallback method becomes available in the WorkflowDesigner.
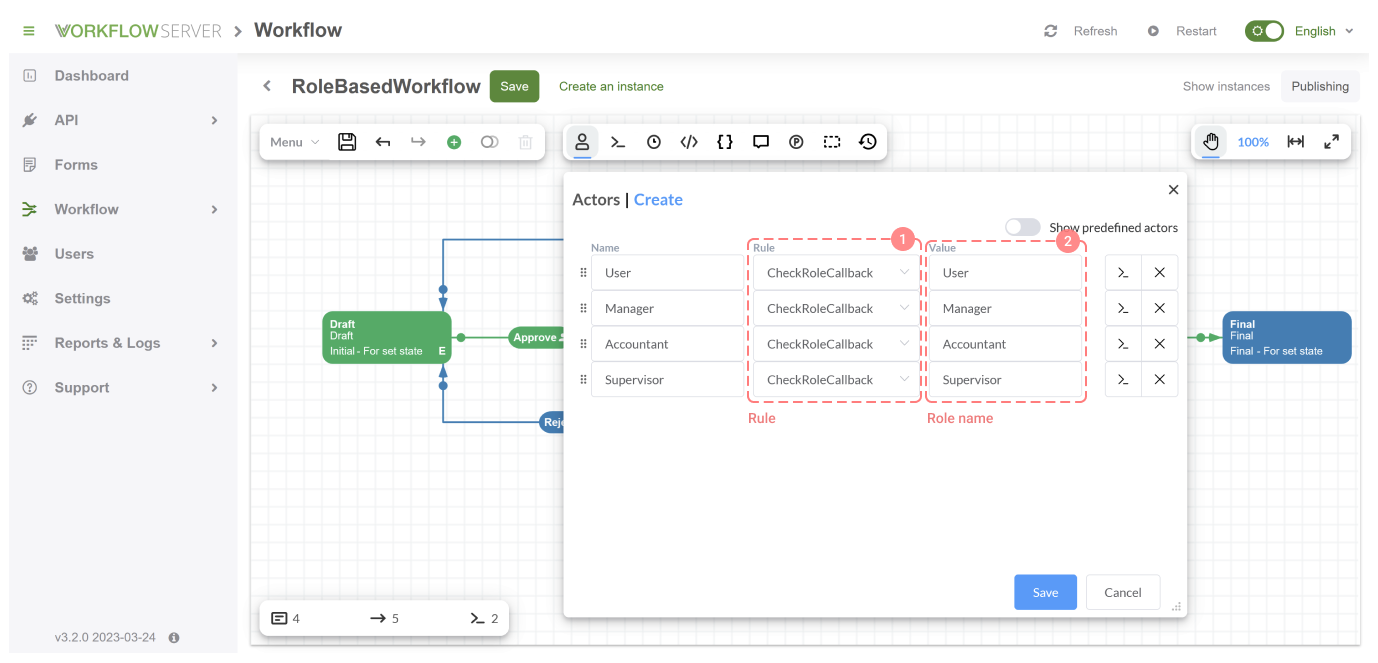
In the Actors section, add the following roles:

- Name – the Actor name to be used in the workflow scheme.
- Rule – select the CheckRoleCallback.
- Parameter – the role name to be used when calling CallbackAPI, and passed to the above functions as
parameter.
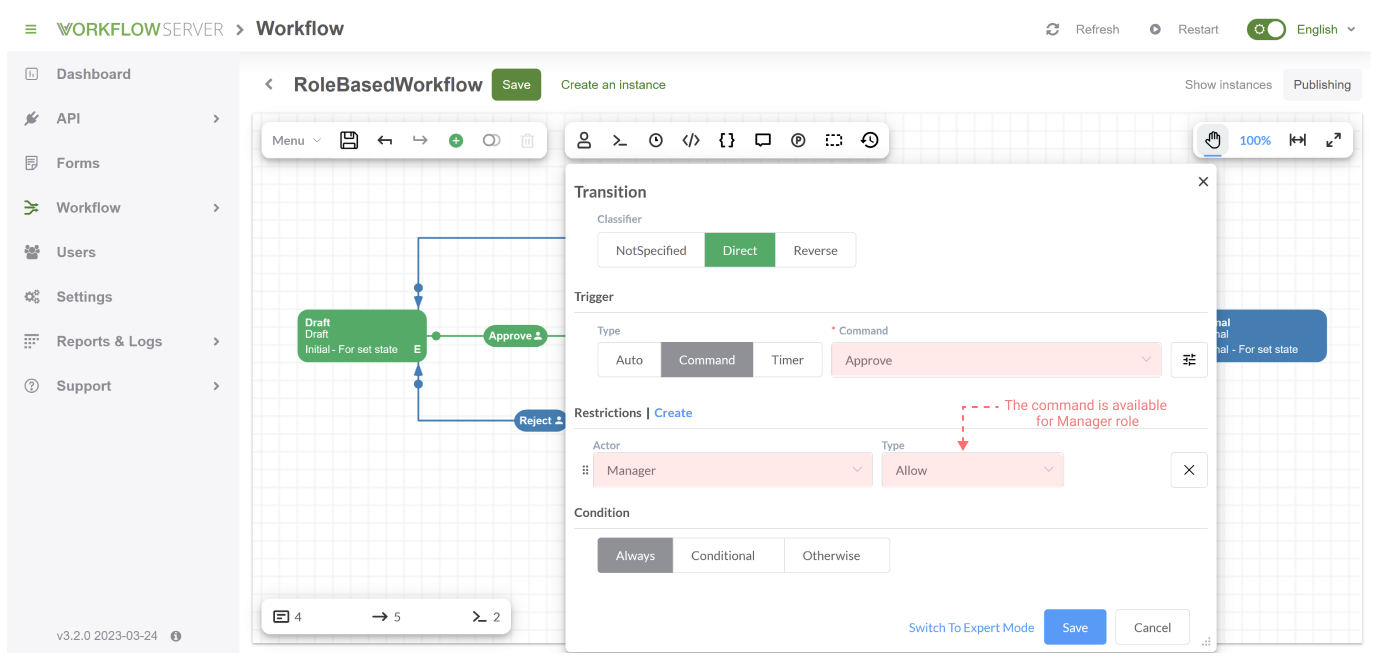
Next, you can limit access to Transitions, using Actors:

When calling WorkflowAPI methods, you specify the identityId parameter. This is the identifier of the user, who initiates the operation (
for example, the operation of obtaining a list of available commands). When checking the user’s access to commands, if the Workflow Server
meets Actor with CheckRoleCallback Rule in the scheme, Workflow Server calls the checkrule method in the Callback server you created to
check whether the user has the role specified. If the role is found (checkrule has returned true) then the command that launches
Transitions (see picture above) becomes available to the user; and, the user becomes able to execute this command and start the transitional
process.